Using The Software – Printing Reports
Select your Document or Report The same basic steps are used to run reports and print documents within the system.
To print a report or document:
Select the required company – see Change Companies.
Either:
Produce a document – for an example see Produce Sales Invoices , or;
Select a record or a range of records to be reported – for an example see Print Customer Statements.
Click OK to accept the data.
Choose the required output medium

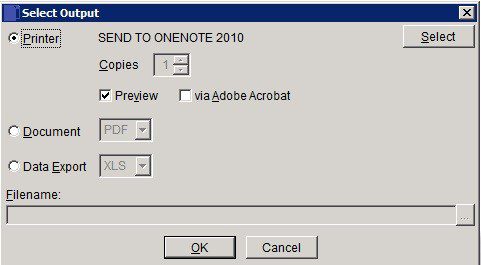
- Clicking to accept will open the Select Output form.
- Printer – click Select to change printer – if radio button selected – see below.
- Copies – Input number or select using scroll buttons.
- Preview – Click to display report on screen – you can then print or close without printing.
- Via Adobe Acrobat – Click to display report on screen using Adobe Acrobat. Not visible if Adobe Acrobat Reader is not installed.
- Document – Pick how the output should be presented – you can: Save the report as a file by selecting a format from a drop-down list – you could then incorporate this file into a report or email it to your colleagues, customers or suppliers. The file you create will be stored in the same folder as the rest of the current company’s data unless you specify a different location.
- Data Export – click to Export Data to a named file format –
-Click the drop down box arrow.
-Select the required file format from the list displayed by clicking the required File Type.
-The file extension selected will be displayed in the drop down box.
Type in a name for the Report File. The selected Report File will be saved to the Company sub-directory
(see Technical Notes) with the appropriate file-type extension. To file elsewhere cick the Browse Button… and then find your folder. Type in the name of the file and then click OK after you return to the Select Output form.
If using a printer, set this up as you require – see Print Setup Form.

- Name – Select target printer from list displayed – if necessary, consult the network administrator for a list of available network printers.
- Status – Indicates whether selected printer is on or off line.
- Where – Where the printer is connected to your computer – Port or Network name.
- Network – Select Network Printer as required.
- OK – Click to run print and close.
- Cancel – Click to abandon print.
You may also automatically email specific documents – see Email Documents to Customers, Suppliers and Others.

- Email – Automatically email the document to the recipient.
- Print – Print the document to the selected printer, even if the recipient account is configured to receive documents automatically by email.
- Skip – Neither Email nor Print, just produce the document and return to the main transaction or enquiry form.

0 Comments