Purchase Ledger
Purpose: To configure the settings so that the purchase ledger gives the business the information it needs to perform effectively when trading with suppliers. The parameters form consists of two pages.
General Page

- Period: Enter a number from 1 to 12 corresponding to the current Nominal Ledger period; keeping in mind the Period Rule (see Period End Processing). This should only be changed when there are no transactions in the system, e.g. when setting up a new company.
- Last Invoice: If you used a sequential number system for your purchase invoices enter in the box the last invoice or credit note number used before transferring your business to your new software. if not please enter 0. Once set this will be automatically incremented by the system each time an invoice or credit note is posted. Check the Override Box to allow this to be overwritten when posting Invoices or Credit Notes.
- VAT Code: Enter the VAT code corresponding to the most commonly used VAT rate used on Purchase Invoices, Credit Notes or Orders – see VAT & Bank Details Page.
- Use VAT domestic reverse charge – select Yes if it applies.
- On Stop: Please ignore – leave as No.
- Credit Limit: Select Yes to allow user to create an order or produce or post an Invoice or Credit Note whilst a supplier account balance exceeds their Credit limit.
- Register: Select Yes if you wish to make use of this facility. This option allows you to specify whether invoices you have posted are directed to the Invoice Register or to the supplier’s account. Supplier invoices can be entered onto the register as soon as they are received. In this way you can ensure that all invoices received are processed.
- Use Received date: To use the date the invoices are received rather than the invoice date – It covers where suppliers invoice arrive late and/or suppliers chase early. Invoices in this situation should be date stamped on the day they arrive.
- Click ‘OK’ to save or ‘Cancel’ to clear and close without saving.
Analysis Page
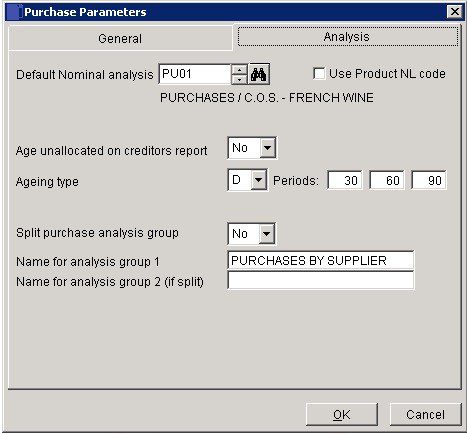
- Analysis: Unless otherwise specified, the net value of a Supplier Invoice or Credit Note will be posted to this Nominal Code. Tick the ‘Use Product NL Code’ only when using Purchasing Order Processing and Stock Control.
- Unallocated: Unallocated cash will be shown as a single column on the Aged Debtors listing, click Yes to age as outstanding amounts.
- Ageing Type: The ageing of a transaction, be it an invoice, payment, etc., is based on the amount of time that has passed between the transaction’s date and the default transaction date. For reporting purposes, this time is grouped into three periods, and the amount of the transaction is then classed as ‘Current‘ – not older than period 1, ‘Over period 1‘ – but less than period 2, ‘Over period 2′ – but less than period 3, and ‘Over period 3‘. The amount of time within these periods is specified in the periods field.
- Select ‘D‘ for days, ‘M‘ for months or ‘C’ for calendar months or ‘E‘ for end of month from the drop down box.
This then applies to all three periods. Each period may then have its own amount of time which does not have to be a multiple of any other period but must be greater than the prior period and less than the next.
D Period days from transaction date
e.g. transaction date = 23/09/2018, Period = 0, Due date = 23/09/2018
e.g. transaction date = 23/09/2018, Period = 15, Due date = 08/10/2018
e.g. transaction date = 23/09/2018, Period = 30, Due date = 23/10/2018
E Period days from end-of-month of transaction date
e.g. transaction date = 23/09/2018, Period = 0, Due date = 30/09/2018
e.g. transaction date = 23/09/2018, Period = 15, Due date = 15/10/2018
e.g. transaction date = 23/09/2018, Period = 30, Due date = 30/10/2018 M Period months from transaction date, or last day of the month if the calculated date doesn’t exist
e.g. transaction date = 23/09/2018, Period = 0, Due date = 23/09/2018
e.g. transaction date = 23/09/2018, Period = 1, Due date = 23/10/2018
e.g. transaction date = 23/09/2018, Period = 2, Due date = 23/11/2018
C Period end-of-months from end-of-month of transaction date
e.g. transaction date = 23/09/2018, Period = 0, Due date = 30/09/2018
e.g. transaction date = 23/09/2018, Period = 1, Due date = 30/10/2018
e.g. transaction date = 23/09/2018, Period = 2, Due date = 30/11/2018
Split: Setting creates a single analysis group defined by a two character reference, Click Yes to make leftmost character of the analysis code as the main group (group 1) and the rightmost character defines sub-groups (group 2) within group 1. This allows you to set up a more complex report.
Click ‘OK’ to save or ‘Cancel’ to clear and close without saving.
0 Comments