Using The Software – Entering Data And Data Types
First, find the record to update
As explained in Tables, Records, Forms and Fields data is stored as records in the system. Each record is identified by its own unique code – The system works by either updating or reporting a particular record or series of records. For processing to be both accurate and complete, users must be able to select specific records, either as ranges or individually, to update and/or report. Each record is indexed using it’s code so that the system can find it easily – the codes used then have to be structured to make finding records easier. The nominal code structure is an example of this.
The first or very early task within a process will generally require you to find the required record in the required company that you wish to process – as follows -.
- Find the company you need.
- Select the company into which you want to enter data – see Change Companies.
- Click on a menu selection – see Menus.
- Click on the required option to open the required form – see Tables, Records, Forms and Fields.
- Search for the record you want to update.
- You will see a drop down & search combo box at the top left hand side of the opening form:

- Click the button to open the search form.
- This will list the records in the table in which the form fields are held.
- In the Search For field enter as much of the name as you can remember. The more text you enter, the more specific the search. The search is not case-sensitive and will find that text anywhere within an account name or product description. For example entering “sons” as search text will find “John Smith & Sons”, “DEBSONS BUILDERS” but not “Allison Smith”.
- Click Find Now button to start the search.
- The results of the search will then appear in the Search Window.
- Click on the required record.
- Click on the OK button on the Search Form.
- The code will appear in the Code Number field and that record’s Standing Data will appear on the form. OR .. scroll through to find the record you want to update. Click on the scroll arrows to the right of the Account Number field to move through the list of codes. The code will be displayed in the input box as will the name of the Account or Product alongside the input box.
- The system scrolls through the appropriate files in alphanumeric order.
- Click OK to accept the Code you require.
Entering Data
After you have found the right record, you can update it by entering transactional data or entering or amending standing data – see Tables, Records, Forms and Fields for a definition of each.
Form fields are labeled so it is generally clear what the system requires to be input. Generally, fields in forms are populated using numbers and letters typed in from the keyboard or similar input device. Some fields require data to be of a particular type and format, or require you to select options from displayed lists. A description of the types of field that can be found on forms is given below.
At any time until you click OK to accept data input to a form, the program allows you to make any changes to your input, e.g. for errors made, using standard Windows editing tools. Once a record is updated by clicking OK you can change the data you have input only by posting a correcting entry – see Editing Data Entry next.
Navigating a Form
As you enter data you will need to move between fields on a form. To do this you can:
Use the Tab key – you will move from field to field in a specific order – the content of each field will be highlighted.
Note that you will not move to the next page of a form or the next Line of input until you press Return or Click.
Click on a field – the content of that field will be highlighted.
Use the Return Key – you will move between fields in a specific order – the content of each field will be highlighted.
The list below shows the types of field used on forms.
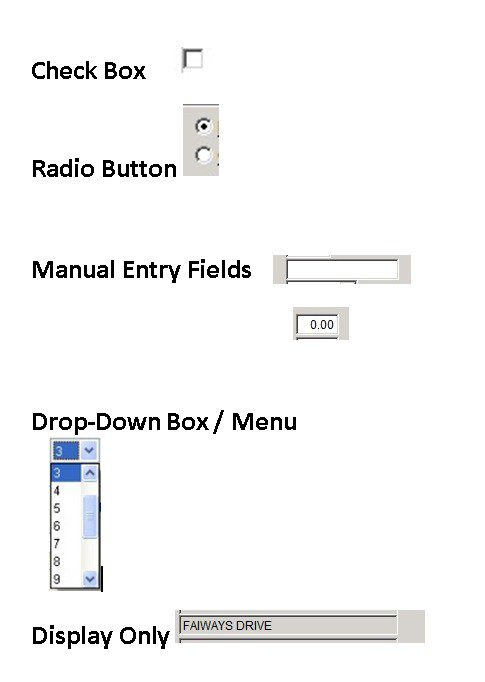
Check Box Normally, check boxes are shown on the screen as a square box that can contain white space (for false/No) or a tick mark or X (for true/Yes). Adjacent to the check box is normally shown a caption describing the meaning of the check box.
Inverting the state of a check box is done by clicking the box. For example – you can check a box on a customer’s account if you want a statement to be produced for that customer.
Radio Button A radio button allows the user to choose one of a predefined set of options. Radio buttons are arranged in groups of two or more and displayed on screen as, for example, a list of circular holes that can contain white space (for unselected) or a dot (for selected). Adjacent to each radio button is normally shown a caption describing the choice that this radio button represents. When the user selects a radio button, any previously selected radio button in the same group becomes deselected.
Click the mouse on a Radio Button to select an option – unlike Check Boxes, only one option can be selected at a time.
Manual Entry Fields Generally, input fields require you to type in text in a specific format – if you type any other format the field remains blank.
The maximum number of characters that can be entered varies with each field and is controlled by the system – once the limit is reached, the field will not accept any further input.
The field name shown on the form will be a good indication of the type of data to be entered, this will be one of three types:
Alpha – accept letters only.
Alphanumeric – accepts combinations of letters and numbers.
Numeric – accepts numbers only. Usually displayed as zeroes to required number of decimal places.
To enter Data:
– Click in a field or press tab to move to a field.
– Type in text.
– Press Return to accept and move to the next field.
Note that some fields will default to Upper Case when the input is accepted.
Drop-Down Box / Menu This is a menu of commands or options that appears when you click on an arrow icon. To use a Drop-Down Box:
– Click on the Down Arrow on the right hand side of the field.
– A list of items will be displayed.
– Scroll through the list.
– Click on an item.
– The item will now appear in the field.
– Press Return to accept and move to the next field.
Display Only These fields are the result of calculations or display data on forms which can then be printed. You cannot enter data into these fields – usually greyed out – also known as Read-only fields.