SOP – Deliver Goods And Services
Purpose:
To record when goods have been despatched prior to invoicing. Repeat as often as required until the customer’s order has been completely delivered.
Preparation:
Select a company – see Change Companies.
Set the default transaction date as required – see Change Accounting Date.
For first time use only: On the main menu click View > Parameters > Sales Order Processing – see Sales Order Processing Parameters – General Page. Set parameters as required.
For first time use only: Design Delivery Note – see Stationery Design.
Processing:
On the main menu click Orders > Customers > Deliver Goods to open form.
Select printer – see Printing Reports.
Either:
Click OK to open form – see Sales Order Selection form and select the required order from the list of all open orders displayed, or using the Account Number Combo Scroll & Search Box click on up and down arrows to scroll through list, and Click OK or
press Return when required selection is displayed, or: search for required code.
Once the customer is selected Click OK.
Click OK to confirm selection and open form.
If default transaction date is earlier than Customer Required Date, a message box appears. Click Yes to continue to deliver goods, No to cancel.
Complete Form details– see Deliver Orders Form below.
Click OK to update records and print Delivery Note.
Filing:
Copies of delivery notes to be filed as required.
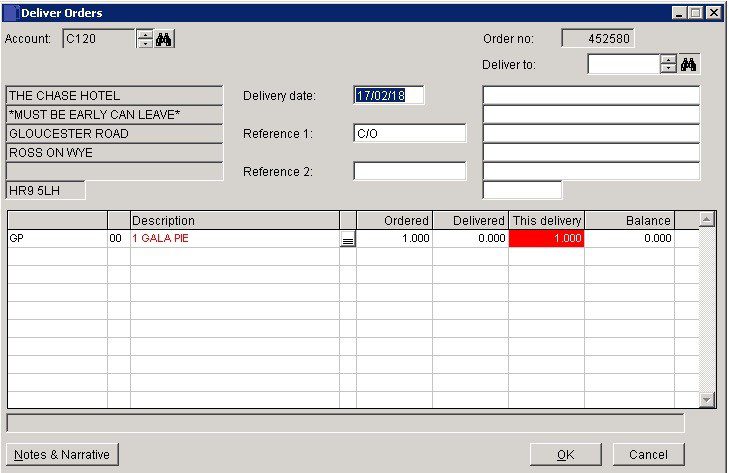
- Confirm that the customer and order Number is correct.
- Select delivery address – if not there add address manually.
- Delivery date: Either: manual entry formatted as DD/MM/YY. Type over the parts of the date you wish to change – the system will skip over the “/” part itself. If the date you enter is invalid; the cursor will return to the start of the date and await a valid entry, or; click on the field to highlight data – white on a blue background – then right click to open the Calendar Menu – see Dates and Calendar.
- References: 2 Fields – Type in a maximum of 16 characters in each field.
- Line notes: Click elipsis … to display the line notes form. Enter notes that are specific to this line item in this transaction. The button turns red when a line item contains notes.
- Can be printed on stationery – see Include line notes in stationery design.
- This delivery: Enter quantity of selected product line being despatched. Repeat until Balance = 0.
- Notes and Narrative: Opens form containing the populated Notes and Narrative fields as shown on the original order. Click in a field to add or amend the text displayed.
OK: Generates and prints Delivery Note. Order status moved to Delivered when reported.
If Use document reprints field is checked on Sales Page in parameters click Yes to reprint – see SOP – Entry & Printing Options.
0 Comments