EPOS
Purpose: To configure settings for the EPOS module to make it work as you wish for your business.
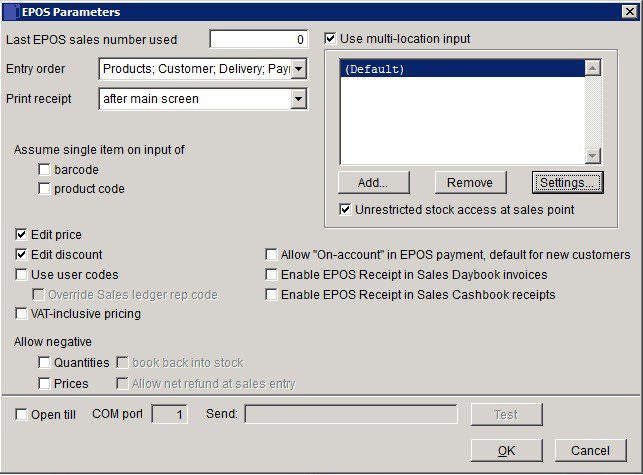
- Last Sales No: Enter in the box the last EPOS sales number used before transferring your business to your new product – Max 8 Characters.
- Entry Order: Select entry order to be used from Products; Customer; Delivery; Payment or Customer; Products; Payment.
- Receipt: Select timing of printing the receipt from after payment confirmation (i.e. payment tendered by customer) or after main screen – receipt printed before payment tendered.
- Assume Single item: Barcode – Check to populate quantity field automatically with a single unit when Bar Code scanned, or; Product code – Check to populate quantity field automatically with a single unit when product code is input, or; Check both boxes, or; leave one or both boxes unchecked to leave quantity field blank.
- Price: Check to allow user to edit sales prices when processing a transaction.
- Discount: Check to allow user to edit sales discounts when processing a transaction.
- User Codes: Check to require the user to enter a user code (password) before processing a transaction. User codes are created as Rep codes and requires Sales Commissions to be activated – see Sales Parameters – General Page.
- Rep Code: With Sales Commissions activated, EPOS transactions will be attributed to customers’ default Sales Rep codes (see Customer Account – Financial Page). Check this box for EPOS transactions to be attributed to the active EPOS user code.
- VAT Incl: Check to show item sales price including VAT when processing a transaction; leave unchecked to show the price nett of VAT.
- Negative Quantities: Check to allow the EPOS user to process negative quantities while processing a transaction – for example to process discounts or product returns.
- Negative Prices: Check to allow the EPOS user to process negative prices while processing a transaction – for example to process discounts.
- Book Back into Stock: Active only if Allow negative quantities is checked. Check for a negative quantity to update the stock record for the specific product. Uncheck if you do not want the stock record to be updated for product returns at the point of sale.
- Net Refund: Active only if Allow negative prices is checked. Check to allow the EPOS user to process a nett refund – e.g. if the value of product returns and/or discounts exceeds the value of sales for a transaction – in an EPOS Sales Entry Form. Uncheck to disallow this.
- Open Till: Check to send signal to COM port to open till when cash has been receipted.
- COM Port: Input number of COM port to be used for the till/cash drawer (default = 1).
- Send: Input required string to open till/cash drawer – refer to till manufacturer’s instructions. Default is Windows Beep character.
- Multi location input: Check to display Warning Message Box. Click Yes to Add or Delete Locations or No to close form without update – 100 locations can be created.
- Unrestricted Access: Check to allow the EPOS user to view and select from all stock locations, not only the default stock location. Uncheck to limit the EPOS user to view and select from only the default stock location. Default stock location is set in EPOS – Location Settings Form.
- Enable EPOS receipt: If using EPOS you can enable these two options and raise invoices and post cash using the daybook facilities – see Produce Sales Invoices and Process Customer Receipts.
- Click ‘OK’ to save or ‘Cancel’ to clear and close without saving.
Location Settings –
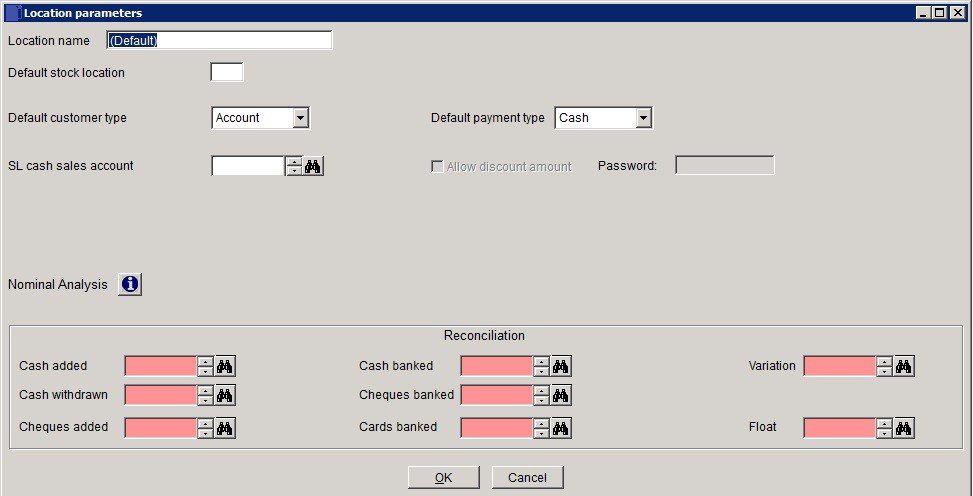
- Name: Max 30 characters – will be used to uniquely identify this location in the system.
- Def Stock Location: Requires multi location stock parameter to be set to Yes – see Stock Control Parameters – General Page. Input stock location to be updated when processing a transaction for this location.
- Def Customer Type: Click on down arrow and select Account for default to be Trade sales; Cash Sale for Retail Sales.
- Def Payment Type: Click on down arrow and select one of the following as the default payment type shown when processing a transaction: Cash – Cheque – Credit Card – Account (greyed out if default customer type set to cash sale).
- SL Cash Sales Account: Requires a Cash sale account to be created in the Sales ledger – see Create & Edit Customer Accounts. Either: click on up and down arrows to scroll through list, and click OK or press Return when required selection is displayed, or: Search for required code.
- Allow discount amount: Check to allow user to round transaction proceeds down when receipting. This is available only when the receipt is printed after payment confirmation – see EPOS Parameters – Main Page. Otherwise, it is greyed out.
- Password: Password for user to accept reduced transaction proceeds.
- Nominal Analysis: Nominal Code structure to enable EPOS to work with Prelude Desktop.
- Reconciliation: Ensure that the required accounts have been created – see Add & Edit Nominal Accounts
- Input the Nominal Accounts to be used by the system for posting transactions following cashing up – see EPOS and Nominal Ledger Codes Form below.
- Click ‘OK‘ to Accept or ‘Cancel’ to return to main form without change.
Nominal Ledger Codes for EPOS –
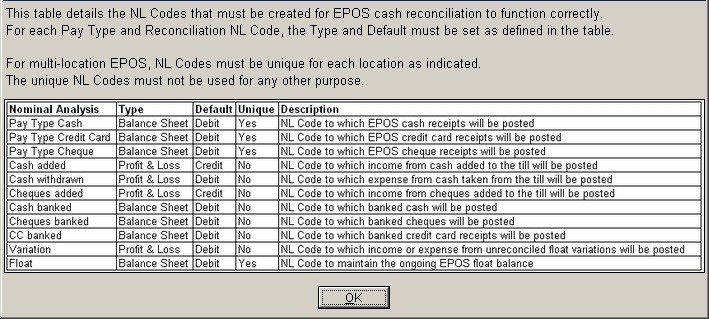
This form summarises the set up of each of the Nominal Ledger Accounts required for EPOS Cash Reconciliation to function properly. The relevant Nominal Ledger Accounts must be set up before EPOS configuration commences – see Add & Edit Nominal Accounts.
Once the accounts have been set up use the drop down boxes on the Location settings form to match the Nominal Accounts descriptions. When creating the accounts take into account the Type and Default as shown in the table.
We suggest you use the following descriptions –
EPOS Cash Receipts & Refunds EPOS Credit Card Receipts & Refunds
EPOS Cheque Receipts & Refunds
Till Income
Till Expenses
Till Cheques Incoming
Till Banked Cash
Till Banked Cheques
Till Banked Credit card Receipts
Till Float variations
Till Float Top ups.
It is important that no other postings are made to these accounts and where there are multiple locations each till must be separately reconcilable – Use the split of the accounts codes – see NL Account Maintenance – Cost Centres or create additional Accounts Codes to facilitate this.
Click ‘OK‘ to close.
Note: The EPOS and DTill functions are also controlled by some elements of the Sales Parameters.
Last invoice number used – for account customers
VAT Codes from Customer or Product .
Override of ‘on stop‘ and ‘over credit limit’ accounts.
Analysis (N/L) codes from Customer or Product – usually product.