Create And Edit Management Reports
Purpose:The system incorporates an easy to use Report Designer which interfaces with the Nominal Ledger. Any combination of nominal account balances can be reported, in any order. Balances on reported accounts can be sub-totalled on a report by using @ commands. Up to 200 lines of report format entries can be made – 10 screens of 20 lines each. Remember that reports may need to be updated when new nominal ledger accounts are created. The same form is used both to create new and to edit existing reports.
Preparation:
Obtain a recent print of the existing chart of accounts – see List Chart of Accounts.
Ensure that all accounts to be reported have the correct default transaction type (Debit or Credit) – see Add & Edit Nominal Accounts.
Agree the report format with users.
Choose the font for your report – bottom of form.
Processing:
On the main menu click Ledgers > Nominal > Management Reports > Edit to open Report Selection Form.
To select an existing report – click on the up and down arrow and then click on the Report Title, then click OK to open the form.
To create a new report – Click on the New button to open form. Enter a title for the new report in the field, then click OK. The new report will be added to the existing list. Select the new report from the list and click OK to open form.
Create or edit the report – see below.
Print layout as required – see Printing Reports
Close form.
Having designed your reports you can copy them to other companies.
On the main menu click File > Company Utilities > Copy Management Reports to open the Copy Management Reports form.
Select the source report – In the left pane, scroll up or down and click on the desired source report name.
Select the target company – In the right pane, scroll up and down and click on the desired target company name.
Click Copy and Yes to copy the report and close form.
Repeat for each source report and target company.
Filing:
File print of design in safe place with other accounts information.

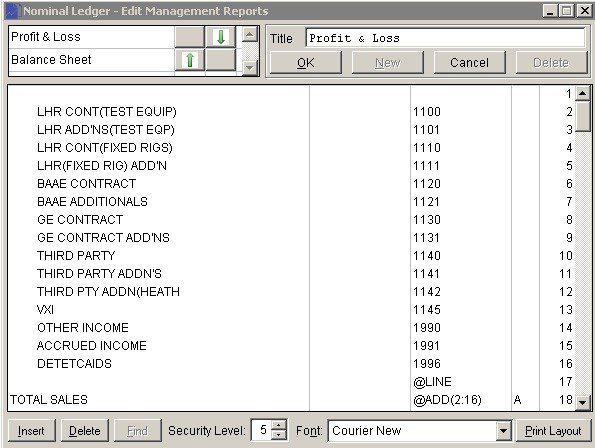
Use arrows to change report’s position in list, click on title then…
OK to accept selected report for editing.
To create a new report click on New.
Close to abandon any changes.

Enter title for report and click OK. This will create a blank report which will appear in the list. To continue, select the report and click Edit.
Column 1 (Headings, Descriptions as required).
This can be left blank or populated with any text that you wish to appear on the report; for example you could enter a heading, an underline or an account description. You can also enter an @ command. These are special commands preceded, without a space, by the @ symbol. The description column recognises the following @ commands:
- @NOPRINT prevents any part of that line being included in the report. The purpose of this is to allow the value columns to be used as part of a calculation or to store the value to one of the memory variables (A-Z) to be used in another part of the report design.
- @PAGE inserts a page break.
- @END marks the end of the report and should be entered after the last line of your design. Everything after @END will be excluded from the report. If @END is omitted, the report might include some trailing blank lines.
Column 2 – Column 3 (value columns)
These columns can contain Nominal Account Code or Group Header or @ command:
- Nominal Account Code – click Find button and select account. The selected account code will appear in column and balance of that account will be inserted into the corresponding column in the report. If the description column on that line was left blank then it will automatically be replaced by the name of the nominal ledger account just entered.
- Nominal Ledger Group Header – Input this to include the total balance of that group of accounts in the report.
- @ commands – The result from the @ command will appear on the report in whichever column the @ command is entered. The @ commands allowed in the value columns are:
- @ADD(x:y) This will add the values from line number x to line number y in that column.
- @A Where A represents any of the 26 memory variables A-Z (shown in Column 4). This will cause the value of that memory variable to be printed on that report in the column where the command is entered.
- @A+@B Where A and B represent any two of the 26 memory variables A-Z. This will print the sum of the two variables in the column where the command is entered. Note you can only use two variables at a time. So the addition of a larger number of variables will need to be done in stages and adding @NOPRINT for each calculation line.
- @A-@B As above but will print the difference of the two variables.
- @LINE Draws a single line across the column where the command is placed. Courier New is the default font.
- @DOUBLE Draws a double line across the column where the command is placed. Courier New is the default font.
- @LIST(XY) This will list all Nominal codes in the XY header group along with their balances. To exclude individual nominal codes from the list, add the accounts as comma-separated arguments (no spaces), e.g. @LIST(XY,08,09) will exclude Nominal codes XY08 and XY09.
- @SUM(XY) This will sum the balances of all Nominal codes of the SA group. To exclude individual Nominal codes from the sum, add the accounts as comma-separated arguments (no spaces), e.g. @SUM(SA,02,03) will sum the balances of the SA group excluding SA02 and SA03. To ensure accuracy the nominal codes are validated and a message generated – either ‘Nominal Group not found’ or ‘Nominal Code not found’.
- @PROFIT displays the net profit in the column where the command is placed. This is calculated as the net sum of all the balances for Nominal Accounts that are defined as type Profit & Loss – see Add & Edit Nominal Accounts.
- @PROFITP is exactly the same as @PROFIT.
- @PROFITB does the same as @PROFIT but with Nominal Accounts that are defined as type Balance Sheet.
Column 4
Memory Variable. After any variable has been printed, its value will be reset to 0. This is so that the variable can be used again. If you wish to keep a variable’s value after printing, store the value to the same, or alternative, variable on the same line.
When you have finished your report design, click OK to save it. You are then offered a printout of your design. Answer Yes or No.
Column 5
Report Line Number (Display only)
Note that you can select the font for your reports to maintain your company style and also choose a security level so only authorised users can view the report. The Default font is Courier New – whatever font is selected will be applied throughout the report – all text including headings.
A further example showing groups and end statement.
