Reporter – Create And Edit Reports
Overview
Reporter is a simple to use and intuitive tool which enhances and extends the already comprehensive suite of reports supplied with the system. The module is designed to inform and monitor business decisions and performance.
The system contains data that is grouped together in tables – see Tables, Records, Forms and Fields for a more detailed description of how data is organised in the system.
Using Reporter you can filter, select and calculate data to produce Information for end users. This is then formatted to be output as either printed documents or files. Output files can then be used as data inputs to produce other reports.
The information content and format of each report will differ; each end user will have their own ideas of what they need to understand that is happening in a business. Recognising this, Reporter forms and pages prompt an ordered and logical “one click” approach to data selection and formatting.
Creating and/or editing reports uses the same form. Reports can be printed or displayed at any time during their creation or edited by simply clicking a button on the Report Maintenance form – see Run Reports.
Processing:
Design report content and format with end user – see Report Design below.
On the main menu click Reporter > Report Definitions.
Enter Report Name – up to 10 Characters
Select data – see Selecting, Calculating, Sorting and Filtering Data below.
Format report – see Formatting Output below.
Print/display report, and review and agree output with end user – see Run Reports.
Report Design:
To avoid misunderstandings about what is to be produced and meet end users’ expectations, consider meeting with them to discuss and agree their requirements. For more complex reports, it is also a good idea to produce a written specification that can be sent to and agreed by the end user.
The following are a set of sample questions to be discussed and answered at a design meeting:
- Who – requires the report? Are they business managers or external stakeholders (creditors, shareholders, auditors, banks)?
- Who is designing this report?
- Should End-User access be restricted through System security? – see Set Passwords to Control Security.
- Why – does the end user need this report? What specific questions need to be answered? Who will they be sharing the information with? Why does this require a bespoke rather than a standard report?
- What – is being reported? Sales, Purchase, Costing, Nominal, Cash? Which data tables and fields are required?
- How is the data to be selected or filtered? What will the report be named (so an end user knows what to ask for in future)?
- When – is this report required? How often is this to be run? Is the report to include a defined date range of transactions?
- How – is the output to be displayed? What should this look like? Is this a data file to be used in a spreadsheet or document? Will the output be in a .csv format for import into another company – or for further work?
The agreed specification, and the designer and end user names and contact details, can be recorded in the Comments Field of the Report Maintenance form – see Report Maintenance – Main Page – below. Any subsequent changes can also be recorded – dated and initialled to create a clear trail for future reference.
Selecting, Calculating, Sorting and Filtering Data
Once a report has been designed, data is selected and filtered to produce the required output.
As with all other system modules, processing follows an ordered sequence designed to ensure the report contains all required data correctly displayed.
Click Run button on the Report Maintenance form during these tasks to review how the final report will appear to the end user as selections are changed.
Select Data Tables required – see Report Maintenance – Main Page – below.
Select Data Fields (as populated in a Data Table) or Generated Fields (which will be reported as the results of a calculation using data table fields) – see Report Maintenance – Fields Select Page.
Modify field Content, left to right display order, style, report column width and display criteria – see Report Maintenance – Fields Adjust Page.
Determine whether and how table data is to be filtered at report run time – see Report Maintenance – Criteria Page.
Report field content and selection criteria can be modified by using the Field Expression Builder.
Formatting Output
Reports are produced as an ordered series of columns from left to right on a document or spreadsheet.
Report formatting is a two stage process:
Determine whether the report will be output as a document or a file, document page orientation and the relative spacing of reported fields – see Report Maintenance – Options Page, then;
Select the line style and colour and fonts to be used see Report Maintenance – Output Format Page.
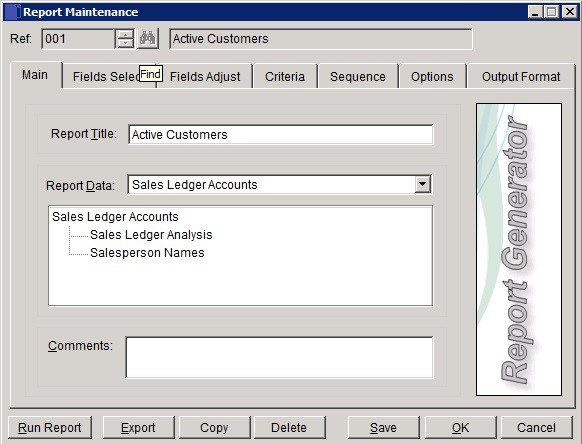
- Report Title: Enter a title to be printed on the report (up to 50 characters).
- Report Data: Scroll through list of Data Files, point at required file and click OK to select. Displays selected data file and any files linked to the selection.
- Comments: Free text – could include name of author and date.
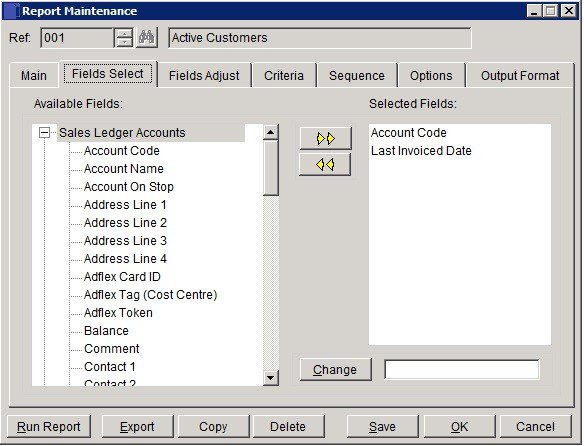
- Available Fields: scroll through list of source data fields, point at required field and click Add Field button .
- Field should then appear in Selected Fields. To remove a field from Selected Fields highlight the field and click on Remove button.
- Generated Fields: Click on up and down arrows to scroll through list of data fields, point at required field and click Add Field button. Use to report either the result of calculations or custom text fields generated using Mathematical, Date, String and/or Logical Expressions.
- Change: Use to rename a generated field to enable its contents to be easily identified.
- Point and click on a field in Selected Fields list.
- Field Name is displayed on the form.
- Click on Text and edit field
- Click Change button.
- Listed Field Name is now changed.
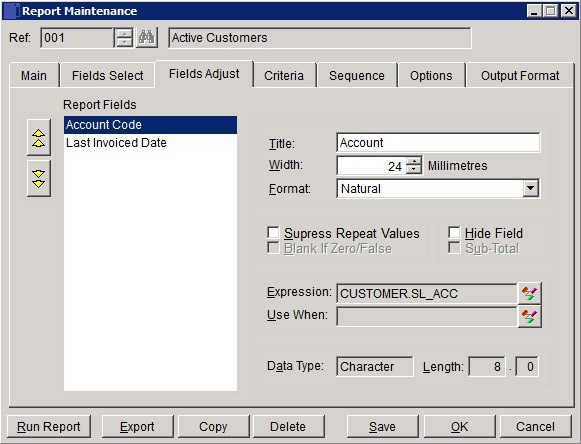
- Report Fields: Fields are listed in ascending order as they will appear on the report. Point and click to select.
- Title: Shows as field name – to amend to show on report – click on text and amend/overtype.
- Width: consider column sizes to fit data on to page – change if necessary – refer to length to help.
- Format: Select from –
- Character Fields – Natural (display text as entered), Uppercase (all letters uppercase), Lowercase (all lowercase) or Capitalise first letters.
- Numeric Fields – Natural (display as stored in File), Whole number, 2, 3 or 4 decimal places.
- Date Fields – Day, Month (number or 3 letters), Year (2 or 4 digits) separated by spaces, dashes or backslash
- Logical Fields – True/False, Y/N, Yes/No.
- Suppress Repeat Values: Check to display only the first of a series of matching records once only.
- Hide Field: To not show on report (e.g. part of calculation).
- Expression & Use When: Calculate and report a value for this field by applying Mathematical, Date, String and/or Logical Expressions to one or more previously selected data fields – see the Field Expression Builder article to use the facility.
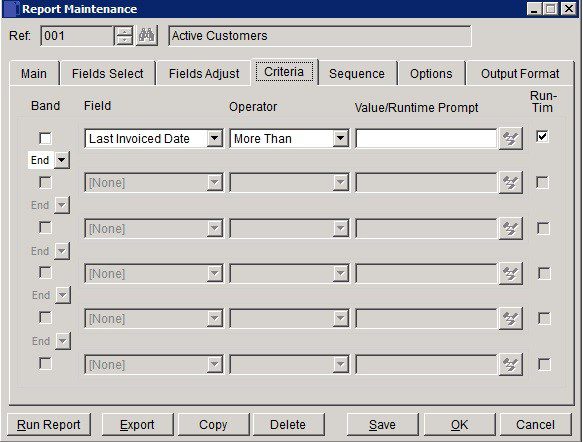
Band: Check to logically group and apply multiple selection criteria to source data.
For example:
A report requires only non zero Debit Balances on accounts with Nominal Groups CA and CL to be displayed.
Selection criteria can be summarised as:
Select Nominal Groups equal to CA OR CL AND with a debit balance not equal to zero.
On the Criteria Page, this selection will appear as follows:
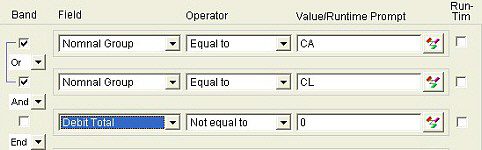
Checking the Band box tells the system to select both accounts with both CA and CL Groups and then select only those with a debit amount not equal to zero.
Select And to report only those records that meet both this and the previous selection criterion.
Select Or to report those records that meet one of either this or the previous record’s selection criterion.
Default is End (of selection criteria) – Select Field and Operator as appropriate
Value/Run Time Prompt: Either:
Enter a value for selection criteria, or; leave blank and check Run-Time checkbox. Enter a value for this in the form displayed each time the report is run, or;
Click button to open Expression Builder to create more complex selection criteria.
Check Run-Time to prompt user to specify for the field when report is run.
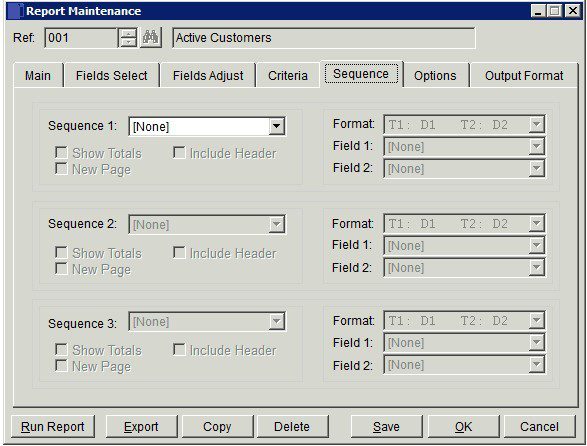
Sequence 1, 2, 3: Creates the sequence in which fields will be displayed on the report in the following order:
Sequence 1 Field 1
Sequence 2 Field 1
Sequence 3 Field 1
Sequence 3 Field 2
Sequence 2 Field 2
Sequence 3 Field 1
Sequence 3 Field 2
Sequence 1 Field 2
The selection process is the same for each sequence – Sequence 1 is shown as an example.
Report is sequenced in ascending order by the selected field.
- Show Totals: Check to generate and display totals for each field.
- Include Header: Check to: Display field names and values on the left hand side of the report, and; open format and field names fields.
- New Page: Create a new page for each field sequence.
- Format: Select Report Header format – Greyed out if Include Header unchecked. Point and click the required Header Format from the selection shown’.
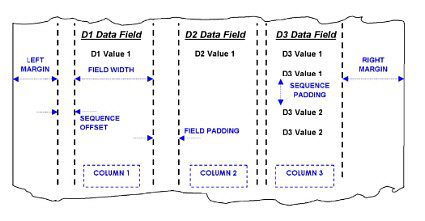
- T= Header Field Name, D= Header Field Description
- 1= Field 1, 2 = Field 2
- Fields are displayed in a single row starting at the left margin in the order Field 1 followed by Field 2.
- Fields: Select which 2 Fields will be displayed as Headers with Field 1 leftmost on the report . Point and click on the required field.
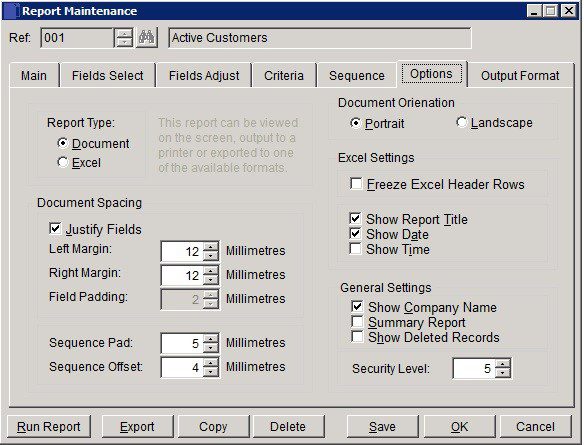
- Excel Settings: Check to freeze spreadsheet below header rows.
- Show Report Title: – on header.
- Show Date and Time: – on footer.
- Document Spacing – refer to diagram above.
- Security Level: Set to allow only users with this security level to run this report.

- Output Design Format: Check to use preset colour schemes on document reports.
- Include Design Lines: Check to display lines around report headings and sequence totals.
- Colour alternate Ledger Rows: Check to print/display alternate rows of data in this colour.
- Font: Sets the font used to print/display Field Titles, Field date, Report Headers and Group Field Data.
- Click on Ellipsis Button
- Point at and click on required Font, Font Style and Size.
- Click OK
- Font attributes are now displayed in the field.
Colour: Sets the print colour of Design Lines, alternate Ledger Rows, Field Titles & Data Fonts, Report Headers and Group Field Data Fonts. Point and click on this Square to open the Color Palette.
- Either; use a basic colour:
- Point to and click on a basic colour, and;
- Click OK to close the palette.
- Colour Square changes to selected colour,
- Or; use a Custom Colour:
- Open Colour Palette
- Click Define Custom Colours button to open form.
- Click and drag Cross Hairs across spectrum until desired colour is displayed in Block|Solid field.
- Click and drag cursor on RHS spectrum to set required Colour Shade.
- Click Add to Custom Colors button – colour displays in Custom Color Fields.
- Point and click on Custom Colour
- Click OK to close the palette.
- Colour Square changes to selected colour.