Sales Ledger – Print Customer Statements
Purpose:
To print in batches or individually, as required – If month end, print statements after the Sales Ledger End of Period has been run to ensure only open transactions are reported. The sales and purchase ledger month end process marks all the matched items as history.
Preparation:
Ensure customer accounts are up to date – see Create & Edit Customer Accounts
Review overdue messages, ensure that these are still relevant – see Messages 1,2,3 – previous article.
Processing:
Either; on the main menu click Ledgers > Sales > Reports > Statements, or click Reports Control button – Sales Page – Statements.
Select printer – see Printing Reports.
Select parameters – see Statements form below.
Click OK to print/display/export to selected file type.
Close form.
Reporting:
Review statements with Sales Department.
Post to customers as soon as possible after printing.
Consider using email or fax to save paper, money and time.
Filing:
Auditors may require a copy of customer statements at year end.
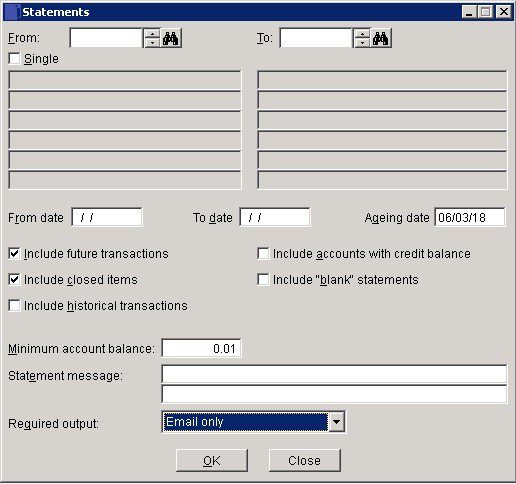
- Single: Check to close To Account field – use to produce a statement of the selected From Account only.
- Dates – From & To: Either: manual entry formatted as DD/MM/YY. Type over the parts of the date you wish to change – the system will skip over the “/” part itself. If the date you enter is invalid; the cursor will return to the start of the date and await a valid entry, or; click on the field to highlight data – white on a blue background – then Right Click to open the Calendar Menu – see Dates and Calendar.
- Include future transactions: Check to include in the statements all transactions that have been posted to future periods .
- Ageing Date: The date from which the ageing takes place: defaults to system date – amend as necessary.
- Include closed items: Check to include in the statements all transactions that were closed – e.g. paid, matched – in the current month.
- Statement message: Text to be printed on all statements in this run.
Required output:
- Email or Print all – send email to email customers, print non-email customers.
- Email & Print all – send email to email customers, print email and non-email customers.
- Email only – send email to email customers, ignore non-email customers.
- Print only – ignore email customers, print non-email customers.
- Print all – print all selected customers including email customers.
- Email – to add record to MAILQ.
“Email Customers” are those which have been configured to receive statements by email in Sales Ledger Account Maintenance – see Customer Account – Miscellaneous Page
Click ‘OK’ to print or ‘Close‘ not to print.
Cumulative balances
The standard format of the statement details is –

To change to show cumulative/running balance modify the statement stationery layout. Copy the open (DOPEN) field into a column at the end and modify the properties –
- Squeeze up the columns to allow rom for an extra column.
- Copy the box outline to accommodate the new field.
- Copy DOPEN into the new column.
- Open Properties and then click on the ‘Calculate’ tab – select Sum from the dropdown – note the reset. Then click OK
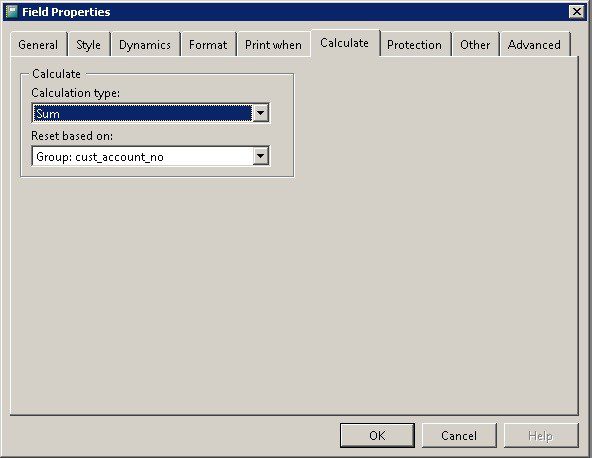
- Mpve the totals to the left to line up.