Connect Your Mobile To Your Exchange Mailbox
Please first read Connect Your Email Client To Your Exchange Mailbox, which includes important information about the required security, encryption and port settings. These may be different from the default settings of your mobile Cloud & Accounts.
Android Devices
Devices running the android operating system include “ActiveSync” like connectivity for Microsoft Exchange and support most if not all of Mail, Contacts, Calendars, Reminders and Notes sync direct with the server. Configuration screens may differ for different devices and different versions of android, but the following instructions and screenshots should be clear.
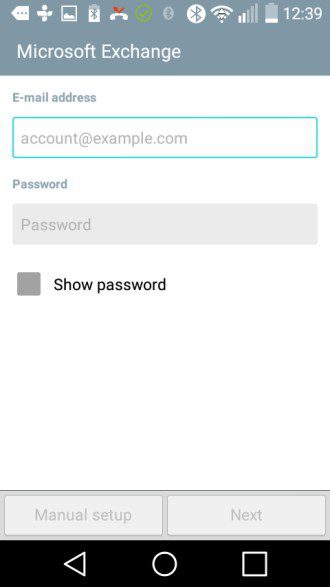
To start, Go to Settings > Accounts & Sync > Add Account > Exchange
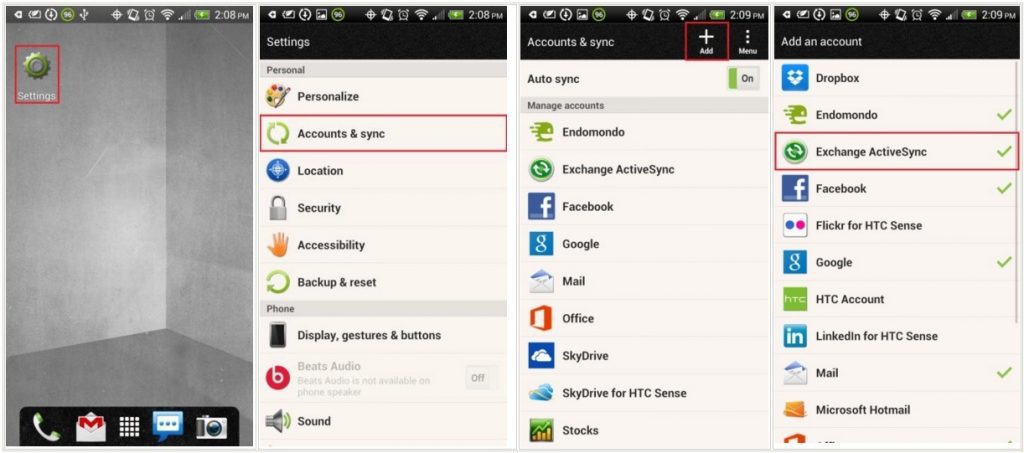
Enter your information
Enter your email address as provided to you, then
Enter your password as provided to you
press ‘Next’
Connect to the exchange Server
- Email Address: This should still be populated from previous
- Server Address: Enter ‘exchange.appsservers.net’
- Domain: Enter ‘appsservers’
- Port number: This should be pre-populated with 443
- Username: Enter your username as provided to you
- Use secure connection (SSL): This should be ticked
If your device does not include a specific field to enter the Domain name, enter the
Username in the form appsservers\username, i.e. with a backslash () between the domain name and your username.
Press ‘Next’
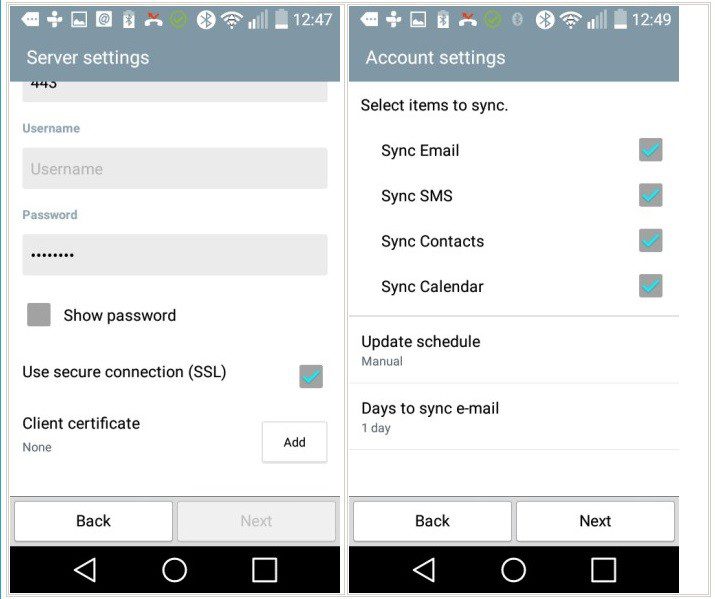
Sync your content
You should, at least, be able to sync Mail, SMS, Contacts and Calendar
Select the content you want and press ‘Next’
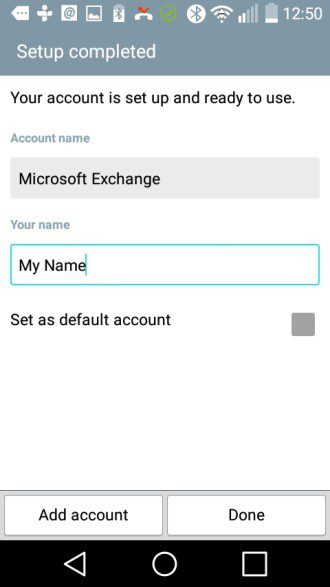
Name your Account
Finally, enter your name as you want it to appear in outgoing emails and a name for the account that you are creating and press ‘Done’
——————————————————————————————————————————————————
Apple iPad, iPhone, iPod
Apple devices include “ActiveSync” like connectivity for Microsoft Exchange and support Mail, Contacts, Calendars, Reminders and Notes sync direct with the server.
Configuration screens may differ slightly for different devices and different versions of iOS (7 and above), but the following instructions and screenshots should be clear.
To start, go to Settings > Mail > Contacts, Calendars > Add Account > Exchange

Enter your information –
- Email – enter your email address as provided to you
- Password – enter your password as provided to you
- Description – enter a suitable account description
- Press ‘Next’
Your device will display ‘Verifying‘ while it is connecting to the server,which might take few minutes.
If any error message is displayed, press ‘Continue‘ to progress to the next screen.
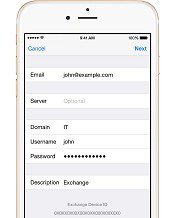
- Connect to the Exchange Server
- Email: This should be populated from previous
- Server: Enter exchange.appsservers.net
- Domain: Enter appsservers
- Username: Enter your username as it was provided to you
- Password: This might still be populated from previous
- Description: This should still be populated from previous
- Press ‘Next’
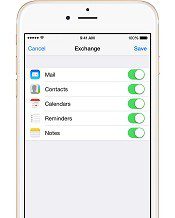
- Sync your content
- You can sync Mail, Contacts, Calendars, Reminders and Notes.
- Select the content you require and press ‘Save‘
To edit your Exchange settings, go to Settings > Mail, Contacts, Calendars, select the Exchange account and edit the settings as required. For example, you can set up automatic out-of-office replies and change the Mail history you want to sync (the default is seven days).
Older versions of iOS
If your setup screens don’t look like these you are probably running an older version of iOS. If you cannot update your version of iOS the following instructions will probably apply. Reminders and Notes might not be supported on your device.
Go to Settings and scroll down to Mail, Contacts, Calendars and select “Microsoft Exchange”.
- Enter your full email address.
- Do not enter anything in the Domain field.
- Enter the user name in the format domain\user. The domain in all cases is the word appsservers.
You must enter the slash. Please note the slash on the first keyboard is the wrong way around (/) and if entered with this key WILL NOT WORK. For the correct slash () press the key marked +#= in the bottom left corner of the keyboard display.
- The user is your username as provided to you.
- Enter your password as provided to you and, when prompted, enter the server name, which is exchange.appsservers.net.
PUSH mail is enabled by default. So if you want to disable it, change the frequency etc. whilst abroad or on holiday you must select Settings, Fetch New Data and make the necessary changes there.
Windows Mobile Active Sync or other similar sync software
Effectively, any Windows Mobile Device with ActiveSync or any other device that runs Mail for Exchange or RoadSync from DataViz uses exactly the same settings as they are fundamentally the same software, albeit re-engineered to work on competing device operating systems.
Use the following settings:
- Server: exchange.appsservers.net
- User: your username as provided to you
- Password: your password as provided to you
- Domain: appsservers
You can enable PUSH email by changing the software sync schedule to “as items arrive”. However, depending on the mobile data plan you have with your provider, push email may increase your phone bill.
With these types of connection, you can synchronise not only mail back and to the server, but also Calendar, Contact and Task records.
Blackberry Internet Service (OWA) access
You can configure access to your mailbox using the BIS Outlook Web Access connection.
Log in to your mobile provider’s BIS service web page and add a new e-mail account, selecting “I want to connect to a work email address”.
You will then be asked for some information regarding Outlook Web Access. Enter this as follows:
- Server URL https://exchange.appsservers.net/owa
- Email address your full e-mail address as provided to you
- Username your username as provided to you
- Password your password as provided to you
- Mailbox name your username as provided to you
If these instructions do not connect you and you are otherwise able to log in using Outlook Web Access directly, it is likely that the problem lies with your mobile provider’s service.
Calendar, Contact and Tasks items are not supported by this connection type. So you will need to synchronise those with your computer using the desktop manager software and cables that may have been supplied with the device.
Blackberry Enterprise Service (BES) for MS Exchange
As yet, Blackberry Enterprise Service (BES) is not available.
IMAP mail client access from the device
There are many different types of devices, each with its own interface and setup steps. However, the settings required are similar in all cases and are as follows:
- In and outbound Server exchange.appsservers.net
- Outbound server requires authentication
- Inbound server requires an encrypted connection (SSL)
- User name appsservers\ e.g. appsservers\joe.user
- Password your password as provided to you
In all cases you will be able to receive a copy of mails in your inbox plus any other folders that you subscribe to using the device’s IMAP options. For more details you should refer to your device’s user handbook.
Any sent items and deletions on the device will be copied back to the server. However, for deletions, you will also need to perform an IMAP purge. Again, you should refer to your device’s user handbook.
Calendar, Contact and Tasks items are not supported by the IMAP protocol. So you will need to synchronise those with your desktop computer using any software and cables that may have been supplied with the device.
Forwarding from your mailbox to the device’s own email address
You can do this for any device with its own e-mail address as provided to you by your mobile service operator. This particularly applies to owners of Blackberry devices that haven’t subscribed to either Blackberry Internet Service (BIS) or Blackberry Enterprise Service (BES).
You can either add your mobile device’s address as a custom alias of your mailbox address or add the forward directly to the mailbox on our server.
Nothing that you do on the device itself will be synchronised with the server with this option and you will only be able to read mail. Any replies sent will be from the device’s own address via your mobile operator’s servers.
0 Comments