Sales Ledger – Import Transactions
Purpose:
Your software includes a powerful utility that allows users to enter large numbers of sales transactions – i.e. invoices and credit notes – by automatically importing selected data from an external CSV (Comma Separated Value) file. This can be very useful, for example, if your customer invoices and credit notes are produced using a different software application, as the alternative would be to post each transaction individually, which can be time consuming and can introduce errors.
Using the other software application, you will need to create a listing of the transaction details in a CSV format file. Refer to the other software application in order to create the CSV file. Transactions can be imported whenever needed, even many times per day, if required.
Preparation: The following list of possible preparation steps will help you decide if you need to do anything before processing and if you need help.
Select a company – see Change Companies.
Obtain an up-to-date customer list – see List Customers.
Obtain an up-to-date nominal code list – see List Chart of Accounts.
Ensure customer details are up to date – see Create & Edit Customer Accounts.
Ensure you have details of Delivery Addresses for goods despatched.
Set the default transaction date as required – see Change Default Transaction Date.
Create the transaction listing CSV file – see Sales Ledger Invoice CSV Import form below.
Processing:
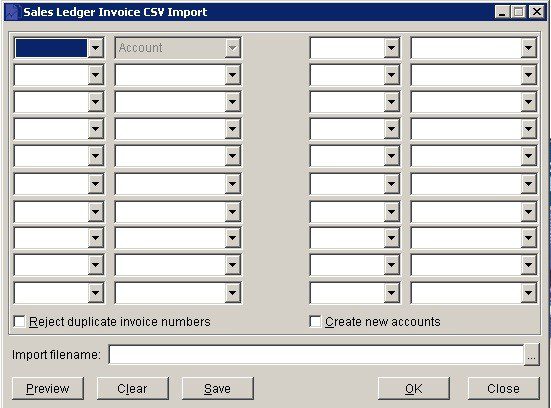
On the main menu, click Daybooks > Sales Daybook > CSV Import to open the Sales Ledger Invoice CSV Import form.
Select the relevant source fields and map each to its appropriate target system data field – see below.
Select the relevant import criteria including the CSV file path.
Click Preview to test the import and Save to save the configuration for future use.
Click OK to accept and update records or click Close.
Balancing/Reconciliation:
Print Daybook Listing and ensure all invoices/credit notes have been posted – see Print Sales Daybook Listings.
Filing:
Write the entered/system generated document number onto the Invoice. File in document number order. File copy of daybook listing for today’s input with documents.

- 2 blocks of 10 possible entries
- Left column entry – first cell enter account code cell name = ‘A’. Thereafter as above select details of cell – ‘B’ etc and in the right cell select the appropriate field.
- The fields don’t have to be in order but the cell must match the selected field – this process is called ‘Mapping’
- When complete find the import CSV file by clicking on the search button.
- Click on the ‘Preview’ button to check – you can always clear and correct until happy.
- ‘Save’ saves the format of the file for future imports.
- Create New Accounts: Check to create new customer accounts where not found – you will need to complete details on these accounts.
- Click on ‘OK’ to import the data and ‘Close‘ to close without saving.

0 Comments