Sales Ledger – Import Customer Data
Purpose:
Your Prelude Desktop product includes a powerful utility that allows users to update large numbers of standing data fields in Product Files or Sales and Purchase Ledgers by automatically importing selected data from an external CSV (Comma Separated Value) file. Up to 40 Data Fields can be imported at any one time. See also – Input Your Opening Data.
Use this to transfer customer standing data from another system into a company set up in your product. Data transferred from an
external file is known as Source Data. Source Data is imported into Target fields in your product.
The process of selecting both Source and Target is known as Mapping. Source Data is mapped to Target Fields.
Preparation:
First time use – refer to Tables, Records, Forms and Fields.
Ensure any data changes have been notified to and agreed with Sales and/or Production Management.
Ensure all other users are off the system.
If needed set up a new company – see Create New Companies.
Go to Processing.
Add additional Customer Details
Ensure existing customer details are complete and up to date.
Create and save CSV file containing the clean data – note the directory in which this is saved. If unsure contact your existing software/system provider for instructions.
Take a backup of the company’s data – see Back Up Company Data
Print a customer listing before importing data – see List Customers.
Identify and note the names of the Source Data fields.
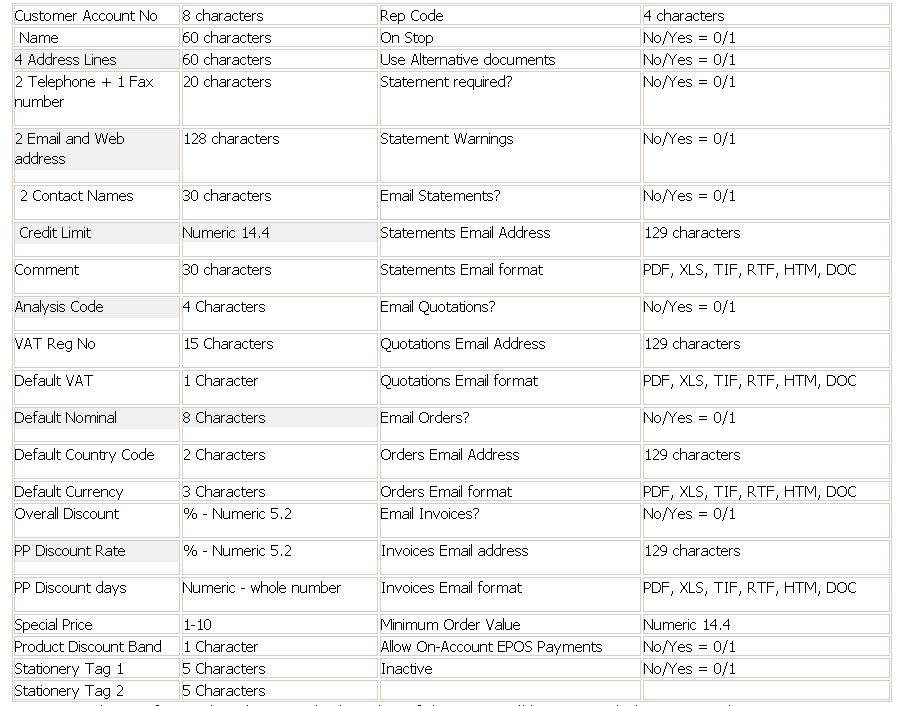
Identify the required Prelude Desktop Target fields – here are details of fields for importing –

Note: Imported data of more than the prescribed number of characters will be truncated when imported.
Processing:
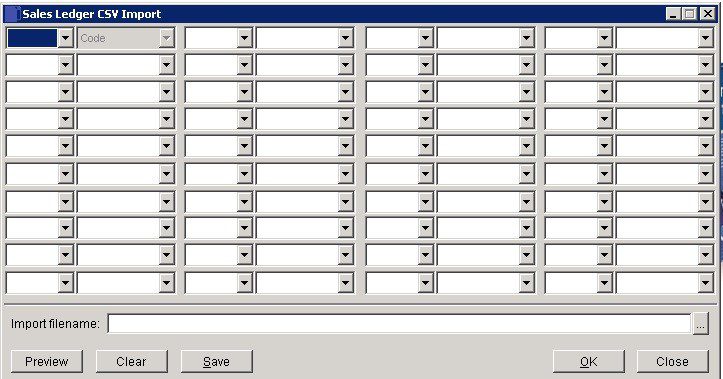
On the main menu click Ledgers > Sales > CSV Import – see Customers CSV Import Form below.
Using the drop down boxes, select Source Data and Target fields.
Preview the data selected.
Correct any selected mappings, and preview data.
Click OK to import data.
Balancing/Reconciliation
Export a customer listing to Excel – see List Customers and compare this with the Customer Listing run before CSV import to ensure that any changes are correct and complete.
Filing:
File both customer listings in a backed up directory.

- 4 blocks of 10 possible entries
- Left column entry – first cell enter account code cell name = ‘A’. Thereafter as above select details of cell – ‘B’ etc and in the right cell select the appropriate field.
- The fields don’t have to be in order but the cell must match the selected field – this process is called ‘Mapping’. When complete find the import CSV file by clicking on the search button.
- Click on the ‘Preview’ button to check – you can always clear and correct until happy.
- ‘Save’ saves the format of the file for future imports.
- Click on ‘OK’ to import the data and ‘Close’ to close without saving.
Preview –


0 Comments