Purchase Order Processing
Purpose: To configure settings for the Purchase Order Processing module to work the way you want for your business. Purchase Order Parameters comprises three pages that need to be set up before you start to use orders for suppliers.
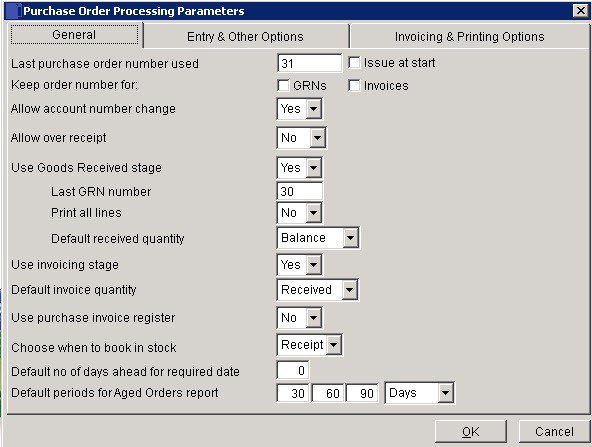
General Page

- Order No: Enter in the box the last order number used before transferring your business to your new software.
- Keep Order No: Only use where Goods Received Note duplicates will not be an issue and only use for invoices where you only have one invoice per order.
- Account number: Yes to change the supplier’s account number during Order Amendment.
- Goods Received Stage: Enter Yes to insert an additional option onto the Purchase Order Processing menu. The option to Receive Goods allows incoming goods to be matched against the relevant Purchase Order, and a Goods Received Note to be produced.
- GRN Number: As Order No. above.
- Print All Lines: Yes to print all lines on the GRN, No to print only those lines being received.
- Received Quantity: The GRN product lines will open pre-populated with your selection.
- Balance: Quantity that remains to be received on the order. None: Zero. These are defaults only and the quantities can be changed by the user before the GRN is produced.
- Invoicing Stage: Yes to process an order right through to receiving the supplier invoice or No to mark orders as complete after receiving the goods and process the supplier invoice using Purchase daybook.
- Register: Yes to direct Invoices to the Invoice Register, No to process to Purchase Ledger.
- Days- Required Date: Enter the default number of days ahead that the order is required. If the required date is the same as the entry date enter 0.
- Report Periods: The ageing of an order is based on the amount of time that has passed between the transaction’s posting date and the default transaction date. This then applies to all three periods. Each period may then have its own amount of time which does not have to be a multiple of any other period but must be greater than the prior period and less than the next. The periods are numbered 1 through 3 starting from the left.
- Orders are reported as being current, i.e. less old than period 1, equal to or older than period 1 and younger than period 2, equal to or older than period 2 and younger than period 3, and equal to or older than period 3
Click ‘OK‘ to save or ‘Cancel’ to clear and close without saving.
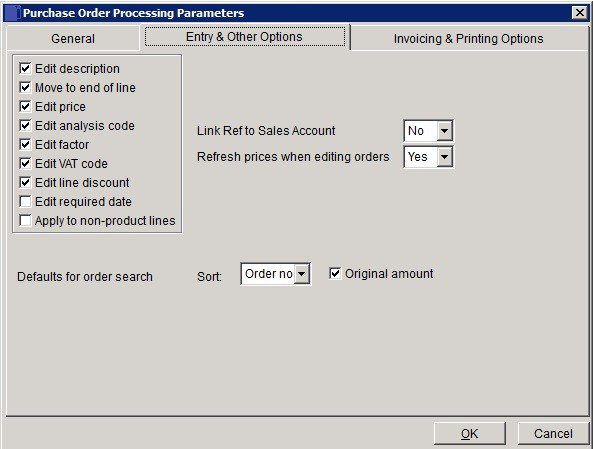
Entry & Other Page

- Edit Description –> Apply to Non-Product Lines: Check to activate these fields in transaction production forms to allow the user to select and enter to them at transaction time. Uncheck to deactivate these fields in transaction forms. The field contents will be visible to the user at transaction time but not editable. This can help security and data entry speed as the user can – and only has to – edit or tab through appropriate fields at transaction time. Required date is calculated from ‘Default no of days ahead for required date’ – see above. Check box is this is variable.
- Link Ref: Select Yes and enter a valid Customer Account in the first reference field on a purchase order to automatically populate the PO delivery address with that customer’s address as shown on the relevant sales ledger header record.
- Order Search: Select search order to be used from Order No, Account or Date. Check Original Amount to display on order search forms etc. the value of the order when it was first entered. Subsequent amendments, deliveries or invoices don’t change this figure. Uncheck to display the “current” order value.
- Click ‘OK’ to save or ‘Cancel’ to clear and close without saving.
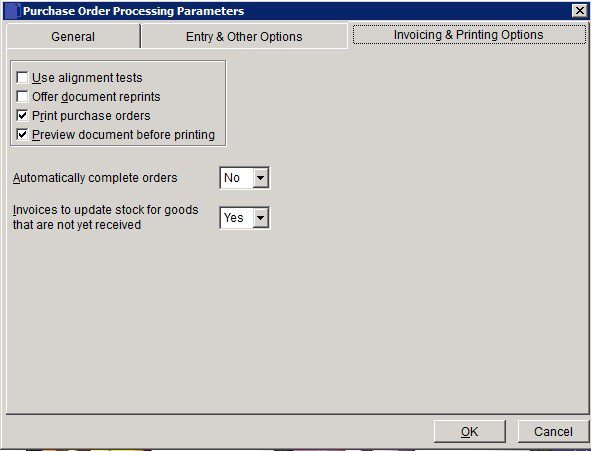
Invoicing & Printing Page

- Alignment: Check to print dummy orders on the printer to check Multiple Form stationery alignment – you will be prompted to do this before you start to produce Purchase Orders or GRNs.
- Reprints: Check to allow more than one copy of an order to be printed – you will be prompted to do this after you have produced an order.
- AutoComplete Orders: At order delivery and invoice stages, if you do not process the complete original order (i.e. part complete), the system will ask you if you wish to complete the order with this part delivery/invoice. Select Yes to deactivate this prompt and to automatically complete part-delivered, part-invoiced orders.
- Click ‘OK’ to save or ‘Cancel‘ to clear and close without saving.

0 Comments